The Photomatix Plugin for Lightroom in included for free in a Photomatix Pro license. Unlike the Aperture Plugin, the Lightroom Plugin uses the standalone Photomatix Pro to process your photos, and therefore cannot work without Photomatix Pro.
As licensed user of the Aperture Plugin, you can upgrade to Photomatix Pro for the $20 price difference between the two products. To request the upgrade pricing, please use this form.
Apple's App Extension SDK is designed for editing one image at at time, which makes it difficult to build a Photos Extension that merges bracketed photos to HDR.
However, our engineers have built an Extension for Photos offering Tone Mapping rendering on single photos. It is called Photomatix OneShot and licenses of the Plugin for Aperture are valid for it.
This happens when the file format of your Export settings is set to PSD. Please follow these steps to correct this:
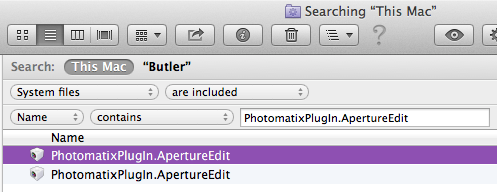
When you installed a newer version of the plugin but the title of the plugin's window still shows an older version, this is likely because there is still an older version of the PhotomatixPlugIn.ApertureEdit file somewhere on your hard drive. As Spotlight does not include plugin files when it searches on your computer, you will have to proceed as follows to find and remove the older version:
This error was reported by several users and seems to be very specific to some settings. The error is apparently due to an issue with how Aperture refreshes its references to the saved files.
The error should not happen anymore in version 3.0, as long as the option 'Import saved image' is checked in the Preferences for the Plugin. If you are using a version of the Plugin older than 3.0, you can upgrade for free to the latest version by downloading it.
The Photomatix HDR Plugin for Apple Aperture offers the following features:
The standalone Photomatix Pro offers all above features. It also offers Selective Deghosting, Batch Processing, Tone Balancer and Fusion/Interior rendering methods, and a Brush Tool, among other features. These features are missing in the current version of the Photomatix Plugin for Aperture.
When you use an Edit Plugin with RAW files, Aperture will first convert these images to TIFF or PSD in order to enable the plugin to edit them. This is what the message "Preparing image for output" means.
When you process your RAW files directly in the standalone Photomatix Pro, you leave the task to convert the RAW files to Photomatix. RAW conversion is a complex task. It involves color conversion from camera to output space among other things, and each RAW converter has its own "secret" recipe to perform the color conversion. Photomatix does not know how Aperture perform its color conversion, so it can't do the same as Aperture.
If you want to compare results from the standalone Photomatix Pro and the plugin for Aperture, you will have to use the same files as input to HDR tone mapping, which are the TIFF (or PSD) versions exported by Aperture. The Photomatix FAQ has more details about this workflow.